All in One View
Content from Part I: Introduction to Julia
Last updated on 2025-08-26 | Edit this page
Objectives
- Learn the basic infrastructure for programming in Julia
- Learn how to install packages and use them in the Julia REPL
Episodes
Content from Introduction
Last updated on 2025-08-29 | Edit this page
Overview
Questions
- What is Julia?
- Why use Julia?
Objectives
- Explain the difference between interpreted and compiled programming languages
- Compare how composing works in Julia and some common programming languages
What is a programming language?
A programming language mediates between the natural language of humans and the machine instructions of a computer. The human specifies what the computer should compute on a high level using the programming language. This specification will be translated to machine instructions, the so called assembly code, which will be executed by the processor (CPU, GPU, …).
Interpreting and compiling
This translation happens differently depending on the programming language you use. There are mainly two different techniques: compiling and interpreting. Interpreted languages such as Python and R translate instructions one at a time, while compiled languages like C and Fortran take whole documents, analyze the structure of the code, and perform optimizations before translating it to machine code.
This leads to more efficient machine instructions of the compiled code at the cost of less flexibility and more verbose code. Most prominently, compiled languages need an explicit type declaration for each variable.
Why Julia?
Just-in-Time (JIT) Compilation
Julia is a programming language that superficially looks like an interpreted language and mostly behaves like one. But before each function is executed it will be compiled just in time.
Thus you get the flexibility of an interpreted language and the execution speed of a compiled language at the cost of waiting a bit longer for the first execution of any function.
Built-in Engineering
Julia has software engineering features integrated into the language.
- dependency management
- packaging
- documentation
- testing
- profiling
Designed for Scientists
Julia includes many tools commonly used in scientific computing.
- multi-dimensional arrays
- linear algebra (including sparse arrays)
- random numbers
- statistics
(and, of course, many other things through easily-accessible packages).
Package Composition
There is another aspect of Julia that makes it interesting and that is the way packages compose. This is captured the best by an analogy from Sam Urmy:
Say you want a toy truck.
The Python/R solution is to look for the appropriate package–like buying a Playmobil truck. It comes pre-manufactured, well-engineered and tested, and does 95% of what you would ever want a toy truck to do.
The Fortran/C solution is to build the truck from scratch. This allows total customization and you can optimize the features and performance however you want. The downside is that it takes more time, you need woodworking skills, and might hurt yourself with the power tools.
The Julia solution is like Legos. You can get the truck kit if you want–which will require a bit more assembly than the Playmobil, but way less than building it from scratch. Or, you can get the component pieces and assemble the truck to your own specs. There’s no limit to what you can put together, and because the pieces all have the same system of bumps, everything snaps together quickly and easily.
OK, sure. Toy trucks are like linear algebra, though, a common request, and every “toy system” will have an implementation that works basically fine. But what if you want a time-traveling sailing/space ship with lasers AND dragon wings? And it should be as easy to build and use as a basic dump truck?
There’s a reason that only Lego ever made anything like Dr. Cyber’s Flying Time Vessel!


Originally posted on Discourse.
- Julia is a just-in-time compiled language
- Julia packages compose well
- Designed for science and engineering
Content from Using the REPL
Last updated on 2025-08-29 | Edit this page
Overview
Questions
- How to use the REPL?
Objectives
- Explore basic functionality of input.
- Learn how to declare variables.
- Learn about REPL modes.
Entering the REPL
Melissa and her classmates open a terminal and launch
julia:
               _
   _       _ _(_)_     |  Documentation: https://docs.julialang.org
  (_)     | (_) (_)    |
   _ _   _| |_  __ _   |  Type "?" for help, "]?" for Pkg help.
  | | | | | | |/ _` |  |
  | | |_| | | | (_| |  |  Version 1.11.6 (2025-07-09)
 _/ |\__'_|_|_|\__'_|  |  Official https://julialang.org/ release
|__/                   |

julia>
This is the so-called REPL, which stands for read-evaluate-print loop. The interactive command-line REPL allows quick and easy execution of Julia statements.
Like the terminal, the Julia REPL has a prompt, where it awaits input:
implicit prompt
Most of the code boxes that follow do not show the
julia> prompt, even though it’s there in the REPL.
Why?
It’s important to delineate input (what you type) and output (how the machine responds). The prompt can be confusing, so it is excluded. You may assume that any Julia box prepends the prompt on each line of input.
Visual Studio Code
An alternative to using the REPL through a terminal is to work with
Visual Studio Code or its open source altenative
VSCodium. VSC is a source code editor for which a julia
extension is available. After installing the application, simply click
on the “Extension” symbol on the left side and search for
julia. Once installed julia remains usable and
can be selected as a programming language in new documents.
For further guidance and visual aid, check out the provided video!
Variables
The first thing they try is to perform basic arithmetic operations:
OUTPUT
30.2That works as expected. It is also possible to bind a name to a value
via the assignment operator =, which makes it easier to
refer to the value later on. These names are called
variables.
OUTPUT
60.4Melissa notices that assignment also returns the value. She can also check which variables are defined in the current session by running
OUTPUT
  name            size summary
  –––––––––––– ––––––– –––––––
  Base                 Module
  Core                 Module
  Main                 Module
  distance     8 bytes Float64
  distance_x_2 8 bytes Float64
Unicode
In Julia, Unicode characters are also allowed as variables like
α = 2. Unicode characters can be entered by a backslash
followed by their LaTeX
name and then pressing tab (in this case
\alphatab).
REPL Modes
Help Mode
Unfortunately Melissa can’t remember the LaTeX name of ∂ so she copies the character , presses ? for help mode,
pastes the ∂ character, then presses enter:
OUTPUT
"∂" can be typed by \partial<tab>Great! This way she can easily look up the names she needs. She gets back to normal mode by pressing backspace.
Exploring Julia’s Help Mode
Help mode can also be used to look up the documentation for Julia
functions. Use Julia’s help mode to read the documentation for the
varinfo() function.
Shell Mode
Another useful mode is the shell mode that can be entered by pressing ;. The prompt has now changed:
Shell mode can be used to issue commands to the underlying shell, but don’t confuse it with an actual shell: special shell syntax like piping won’t work. Like before, hit backspace to get back to the Julia prompt.
Hello, shell>
(pwd and cd) !
Two commonly used shell commands are pwd
(print working
directory) and cd (change
directory).
- Use
pwdto find out what is your current working directory. - Type the command
cdin shell mode, which by default will bring you to your “home directory”. - Use
pwdagain. Did you get a different result from before? Why or why not?
The working directory is the location from which you launched Julia.
To navigate to a different directory, you can use the cd
command by entering: cd <directory>. By default, this
command will return you to your home directory if a specific directory
is not given. If you initially launched Julia from your home directory,
the working directory remains unchanged, so the output of the second
pwd command will be identical to the first. Conversely, if
you were in a different directory when you started Julia, the results of
the two pwd commands will differ. You can use
cd - to go back to your previous location.
Hello, shell>
(ls)!
Another useful shell command is ls (list
files). Use it to show the contents of your home directory.
Hello, shell>
(nano and cat)!
Use the shell mode to create a file called hello.jl with
the nano terminal text editor. Inside that file write the simple hello
world program print("Hello World!").
Check the content of the file using cat hello.jl and
then run the program using julia hello.jl.
include
The include function executes the code from a file in
the current context. Let’s modify the previous challenge to illustrate
this.
Challenge
Edit the file hello.jl to print the value of a variable
x with print("Hello, ", x) (use
?print if you’re curious). Define x in the
REPL and include hello.jl to use the variable.
Before we move on let’s delete the file we created:
- The REPL will
- Read the given input
- Evaluate the given expression
- Print the result to the user
- Loop back to the prompt again
- Pressing ? enters help mode.
- Pressing ; enters shell mode.
- Pressing ] enters pkg mode.
- To exit shell, help or pkg mode, hit backspace.
Content from The Julia Type System
Last updated on 2025-08-29 | Edit this page
Overview
Questions
- What is the use of types?
- How are types organized in Julia?
Objectives
- Understand the structure of the type tree.
- Know how to traverse the type tree.
- Know how to build mutable and immutable types.
Structuring variables
Melissa wants to keep the variables corresponding to the trebuchet
(counterweight, release_angle) separate from
the variables coming from the environment (wind,
target_distance). That is why she chooses to group them
together using structures. There are two structure types:
- immutable structures, whose fields can not be changed after creation
- keyword:
struct
- keyword:
- mutable structures, whose fields can change after creation
- keyword:
mutable struct
- keyword:
Since Melissa wants to change the parameters of the trebuchet, she
uses a mutable struct for it. But she cannot influence the
environment and thus uses a struct for those values.
Types and hierarchy
Here ::Float64 is a type specification, indicating that
this variable should be a 64-bit floating point number, and
:: is an operator that is read
“is an instance of.” If Melissa hadn’t specified the type, the variables
would have the type Any by default.
In Julia every type can have only one supertype, so let’s count how
many types are between Float64 and Any:
1.
OUTPUT
AbstractFloat2.
OUTPUT
Real3.
OUTPUT
Number4.
OUTPUT
AnySo we have the relationship
Float64 <: AbstractFloat <: Real <: Number <: Any
where <:
is the subtype operator, used here to mean the item on the
left “is a subtype of” the item on the right.
Float64 is a concrete type, which means that
you can actually create objects of this type. For example
1.0 is an object of type Float64. We can check
this at the REPL using either (or both) the typeof function
or the isa
operator:
OUTPUT
Float64or
OUTPUT
trueAll the other types are abstract types that are used to
address groups of types. For example, if we declare a variable as
a::Real then it can be bound to any value that is a subtype
of Real.
Let’s quickly check what are all the subtypes of
Real:
OUTPUT
4-element Vector{Any}:
 AbstractFloat
 AbstractIrrational
 Integer
 Rational
This way the types form a tree with abstract types on the nodes and
concrete types as leaves. Have a look at this visualization of all
subtypes of Number: 
The correct answer is 4: while 1 is an integer,
1.0 is a floating-point value.
Instances
So far Melissa only defined the layout of her new types
Trebuchet and Environment. To actually create
a value of this type she has to call the so called constructor,
which is a function with the same name as the corresponding type and as
many arguments as there are fields.
OUTPUT
Trebuchet(500.0, 0.7853981633974483)Note how the values will get converted to the specified field type.
OUTPUT
Environment(5.0, 100.0)trebuchet is called an instance or
object of the type Trebuchet. There can only ever
be one definition of the type Trebuchet but you can create
many instances of that type with different values for its fields.
Since the type Trebuchet was defined as a
mutable struct, the instance trebuchet can be
changed.
OUTPUT
1.2566370614359172OUTPUT
Trebuchet(500.0, 1.2566370614359172)The instance environment cannot, however, since the type
Environment is immutable.
ERROR
ERROR: setfield!: immutable struct of type Environment cannot be changed
Stacktrace:
[...]
A Little More about Types
Let’s look at an example of a parametric type:
Vector{T}. The braces indicate the parameter(s). The name
Vector without the parameter is a special type of abstract
type called a UnionAll. That’s because the parameter is
needed to specify a concrete type.
OUTPUT
UnionAllOUTPUT
DataTypeOUTPUT
(Vector, DenseVector, AbstractVector, Any)OUTPUT
(Vector{Float64}, DenseVector{Float64}, AbstractVector{Float64}, Any)Type constraints
You can see two “dimensions” of abstraction here, the hierarchy and the parameter. Remember abstract types represent “groups” of types that are intuitively similar. This is useful when defining structures or functions that need to be generic. When you need your function to apply to a group of possible input types, you simply think in terms of how tight the constraint needs to be.
Don’t change a variable’s type
While a variable that is specified to be an abstract type can change types within that constraint, it is best to avoid changing the type of a local variable, especially in places that are performance-critical.
Creating a subtype
A concrete type can be made a subtype of an abstract type with the
subtype operator <:. Since
Trebuchet contains several fields that are mutable Melissa
thinks it is a good idea to make it a subtype of
AbstractVector.
Caveat: Redefining Structs
JULIA
mutable struct Trebuchet <: AbstractVector{Float64}
  counterweight::Float64
  release_angle::Float64
end
ERROR
ERROR: invalid redefinition of constant Main.Trebuchet
Stacktrace:
[1] top-level scope
   @ REPL[9]:1
This error message is clear: you’re not allowed to define a
struct using a name that’s already in use.
Restart the REPL
In Julia it is not very easy to redefine a struct. It is
necessary to restart the REPL to define the new definition of
Trebuchet, or take a different name instead.
Melissa decides to keep going and come back to this later.
- In Julia types have only one direct supertype.
Content from Using the Package Manager
Last updated on 2025-09-30 | Edit this page
Overview
Questions
- Where do I find packages?
- How do I add packages?
- How can I use packages?
Objectives
- Learn to add packages using pkg-mode
- Learn to resolve name conflicts
- Learn to activate environments
The Package Manager
The package manager
This chapter focuses on the package mode available within the REPL.
A different approach would be using the Pkg package in
regular Julia code.
If you prefer to use that method and want to know more, remember how to get help.
(e.g., ?Pkg.add)
Now it is time for Melissa and their mates to simulate the launch of
the trebuchet. The necessary equations are really complicated, but an
investigation on JuliaHub revealed
that someone already implemented these and published it as the Julia
package Trebuchet.jl.
That saves some real work.
Melissa enters package mode by pressing ]:
The julia> prompt becomes a blue pkg>
prompt that shows the Julia version that Melissa is running.
After consulting the documentation she knows that the prompt is showing the currently activated environment and that this is the global environment that is activated by default.
However, she doesn’t want to clutter the global environment when
working on her project. The default global environment is indicated with
(@v1.x) before the pkg> prompt, where
x is the minor version number of julia, so on julia 1.11 it
will look like (@v1.11). To create a new environment she
uses the activate function of the package manager:
OUTPUT
Activating new project at `~/projects/trebuchet`In this environment she adds the Trebuchet package from
its open source code repository on GitHub
by typing
Melissa quickly recognizes that far more packages are being installed
than just Trebuchet. These are the dependencies of
Trebuchet. From the output
OUTPUT
[...]
  Updating `[...]/projects/trebuchet/Project.toml`
[98b73d46] + Trebuchet v#.#.#
  Updating `[...]/projects/trebuchet/Manifest.toml`
[1520ce14] + AbstractTrees v#.#.#
[79e6a3ab] + Adapt v#.#.#
[...]
she sees that two files were created: Project.toml and
Manifest.toml.
The project file Project.toml only contains the packages
needed for her project, while the manifest file
Manifest.toml records the direct and indirect dependencies
as well as their current version, thus providing a fully reproducible
record of the code that is actually executed. “That is really handy when
I want to share my work with the others,” thinks Melissa.
After the installation finished she can check the packages present in her environment.
OUTPUT
Status `~/projects/trebuchet/Project.toml`
  [98b73d46] Trebuchet v0.2.2
Why use GitHub?
Melissa could have added the GitHub version of Trebuchet.jl by typing
In this case the JuliaHub version is the same as the GitHub version, so Melissa does not need to specify the installation.
If you know a package is stable, go ahead and install the default version registered on JuliaHub. Otherwise, it’s good to check how different that version is from the current state of the software project. Click through the link under “Repository” on the JuliaHub package page.
Using and importing packages
Now that Melissa added the package to her environment, she needs to
load it. Julia provides two keywords for loading packages:
using and import.
The difference is that import brings only the name of
the package into the namespace and then all functions in that package
need the name in front (prefixed). But packages can define a list of
function names to export, which means the functions should be brought
into the user’s namespace when he loads the package with
using. This makes working at the REPL more convenient.
Name conflicts
It may happen that name conflicts arise. For example Melissa defined
a structure named Trebuchet, but the package she added to
the environment is also named Trebuchet. Now she would get
an error if she tried to import/using it
directly. One solution is to assign a nickname or alias to the package
upon import using the keyword as:
- Find packages on JuliaHub
- add packages using
pkg> add - use many small environments rather than one big environment
Content from Part II: Programming in Julia
Last updated on 2025-09-17 | Edit this page
Objectives
- Learn to write functions
- Learn how interfaces work
- Learn basic control flow structures
Episodes
Content from Write functions!
Last updated on 2025-09-30 | Edit this page
Overview
Questions
- How do I call a function?
- Where can I find help about using a function?
- What are methods?
Objectives
- Usage of positional and keyword arguments
- Defining named and anonymous functions
- Reading error messages
Working with functions
Now that Melissa successfully installed the package she wants to figure out what she can do with it.
Julia’s Base module offers a handy function for
inspecting other modules called names. Let’s look at its
docstring; remember that pressing ? opens the
help?> prompt:
OUTPUT
    names(x::Module; all::Bool = false, imported::Bool = false)

    Get a vector of the public names of a Module, excluding deprecated names. If
    all is true, then the list also includes non-public names defined in the
    module, deprecated names, and compiler-generated names. If imported is true,
    then names explicitly imported from other modules are also included. Names
    are returned in sorted order.

    As a special case, all names defined in Main are considered "public", since
    it is not idiomatic to explicitly mark names from Main as public.
In Julia we have two types of arguments: positional and keyword, separated by a semi-colon.
- Positional arguments are determined by their position and thus the order in which arguments are given to the function matters.
- Keyword arguments are passed as a combination of the keyword and the value to the function. They can be given in any order, but they need to have a default value.
Function Parameters
Let’s take a closer look at the signature of the names
function:
It takes three arguments:
-
x, a positional argument of typeModule, followed by a; -
all, a keyword argument of typeBoolwith a default value offalse -
imported, anotherBoolkeyword argument that defaults tofalse
Suppose Melissa wanted to get all names of the
Trebuchets module, including those that are not exported.
What would the function call look like?
names(Trebuchets, true)-
names(Trebuchets, all = true) names(Trebuchets, all)-
names(Trebuchets; all = true) - Both 2 and 4
- Both arguments are present, but
trueis presented without a keyword. This throws aMethodError: no method matching names(::Module, ::Bool) - This is a correct call.
- Two arguments are present, but the keyword
allis not assigned a value. This throws aMethodError: no method matching names(::Module, ::typeof(all)) - This is also correct: you can specify
where the positional arguments end with the
;, but you do not have to. - This is the most correct answer.
Before starting to work in a new document, Melissa has to:
- Activate her environment
OUTPUT
Activating project at `~/projects/trebuchet`- Import the package under its modified name
- Define the structures
JULIA
mutable struct Trebuchet <: AbstractVector{Float64}
    counterweight::Float64
    release_angle::Float64
end

struct Environment
    wind::Float64
    target_distance::Float64
end
Now she can execute
OUTPUT
6-element Vector{Symbol}:
 :Trebuchet
 :TrebuchetState
 :run
 :shoot
 :simulate
 :visualise
which yields the exported names of the Trebuchets
module. By convention types are named with CamelCase while
functions typically have snake_case. Since Melissa is
interested in simulating shots, she looks at the shoot
function from Trebuchets (again, using ?):
OUTPUT
  shoot(ws, angle, w)
  shoot((ws, angle, w))

  Shoots a Trebuchet with weight w in kg. Releases the weight at the release
  angle angle in radians. The current wind speed is ws in m/s.
Returns (t, dist), with travel time t in s and travelled distance dist in m.Generic functions and methods
In the output we see that shoot has two different
argument signatures: one with three arguments and one with a
Tuple of three elements as its single argument. These two
signatures correspond to two different implementations. In our case one
is calling the other.
Functions of the same name with different argument signatures are
called methods of a generic function of that name. In
our example we have two methods of the shoot generic
function.
Almost all function in Julia are generic functions and in particular
all user defined functions. An example with particularly many methods is
+. You can list its methods by executing
methods(+), for example.
Julia determines which method to apply to a tuple of arguments according to set of rules, which are documented in the Julia Manual’s Methods section.
Now she is ready to fire the first shot.
OUTPUT
(Trebuchet.TrebuchetState(Trebuchet.Lengths{Float64}(1.524, 2.0702016, 0.5334, 0.6096, 2.0826984, 0.8311896, 0.037947600000000005), Trebuchet.Masses{Float64}(226.796185, 0.14877829736, 4.8307587405), Trebuchet.Angles{Float64}(-0.4328124904398228, 1.1928977546511481, 1.437218009822302), Trebuchet.AnglularVelocities{Float64}(-6.80709816163242, 10.240657933288563, -22.420510883318446), Trebuchet.Constants{Float64}(5.0, 1.0, 1.0, 9.80665, 0.7853981633974482), Trebuchet.Inertias{Float64}(0.042140110093804806, 2.7288719786342384), Val{:End}(), 60.0, Trebuchet.Vec(114.88494815382731, -1.5239999999999991), Trebuchet.Vec(10.886295450427806, -21.290442812748466), Solution(387) , 3.943408301947865, Val{:Released}()), 114.88494815382731)That is a lot of output, but Melissa is actually only interested in the distance, which is the second element of the tuple that was returned. So she tries again and grabs the second element this time:
OUTPUT
114.88494815382731which means the shot traveled approximately 115 m.
Defining functions
Melissa wants to make her future work easier and she fears she might forget to take the second element. That’s why she puts it together in a function like this:
JULIA
function shoot_distance(windspeed, angle, weight)
    Trebuchets.shoot(windspeed, angle, weight)[2]
end
OUTPUT
shoot_distance (generic function with 1 method)Implicit return
Note that Melissa didn’t have to use the return keyword,
since in Julia the value of the last line will be returned by default.
But she could have used an explicit return and the function would behave
the same.
Now Melissa can just call her wrapper function:
OUTPUT
114.88494815382731Adding methods
Since Melissa wants to work with the structs Trebuchet
and Environment, she adds another convenience method for
those:
JULIA
function shoot_distance(trebuchet::Trebuchet, env::Environment)
     shoot_distance(env.wind, trebuchet.release_angle, trebuchet.counterweight)
end
OUTPUT
shoot_distance (generic function with 2 methods)This method will call the former method and pass the correct fields
from the Trebuchet and Environment
structures.
Slurping and splatting
By peeking into the documentation,
Melissa discovers that she doesn’t need to explicitly declare all the
input arguments. Instead she can slurp the arguments in the
function definition and splat them in the function body using
three dots (...) like this:
OUTPUT
shoot_distance (generic function with 3 methods)Anonymous functions
Sometimes it is useful to have a new function and not have to come up with a new name. These are anonymous functions. They can be defined with either the so-called stabby lambda notation,
OUTPUT
#1 (generic function with 1 method)or in long form, by omitting the name:
OUTPUT
#3 (generic function with 1 method)Calling methods
Now that she defined all these methods she tries calling a few
OUTPUT
114.88494815382731OUTPUT
114.88494815382731For the other method she needs to construct Trebuchet
and Environment objects first
OUTPUT
Environment(5.0, 100.0)ERROR
MethodError: no method matching size(::Trebuchet)
Closest candidates are:
size(::AbstractArray{T, N}, !Matched::Any) where {T, N}
@ Base abstractarray.jl:42
size(!Matched::Union{LinearAlgebra.QR, LinearAlgebra.QRCompactWY, LinearAlgebra.QRPivoted})
@ LinearAlgebra /opt/hostedtoolcache/julia/1.9.4/x64/share/julia/stdlib/v1.9/LinearAlgebra/src/qr.jl:582
size(!Matched::Union{LinearAlgebra.QR, LinearAlgebra.QRCompactWY, LinearAlgebra.QRPivoted}, !Matched::Integer)
@ LinearAlgebra /opt/hostedtoolcache/julia/1.9.4/x64/share/julia/stdlib/v1.9/LinearAlgebra/src/qr.jl:581
...
Errors and finding documentation
This error tells her two things:
- a function named
sizewas called - it didn’t have a method for
Trebuchet
Melissa wants to add the missing method to size but she
doesn’t know where it is defined. There is a handy macro named
@which that obtains the module where the function is
defined.
Macros
Macro names begin with @ and they don’t need parentheses
or commas to delimit their arguments. Macros can transform any valid
Julia expression and are quite powerful. They can be expanded by
prepending @macroexpand to the macro call of interest.
OUTPUT
BaseNow Melissa knows she needs to add a method to Base.size
with the signature (::Trebuchet).
She can also lookup the docstring using the @doc
macro
OUTPUT
size(A::AbstractArray, [dim])
Return a tuple containing the dimensions of A. Optionally you can specify a
dimension to just get the length of that dimension.
Note that size may not be defined for arrays with non-standard indices, in
which case axes may be useful. See the manual chapter on arrays with custom
indices.
See also: length, ndims, eachindex, sizeof.
Examples
≡≡≡≡≡≡≡≡
julia> A = fill(1, (2,3,4));
julia> size(A)
(2, 3, 4)
julia> size(A, 2)
3
size(cb::CircularBuffer)
Return a tuple with the size of the buffer.
With that information she can now implement this method:
But that is a 3 lines of text for a very short definition. Melissa can also using the short form notation to fit this in a single line:
Omitting unneeded arguments
Melissa could also name the argument in the signature. Like this:
(trebuchet::Trebuchet), but since the argument is not
needed to compute the output of the function she can omit it. The
argument is in this case only used to dispatch to the correct
method.
Now she can try again
ERROR
CanonicalIndexError: getindex not defined for TrebuchetAgain, there is an error but this time the error message is
different: It’s no longer a method for size that is missing
but for getindex. She looks up the documentation for that
function
OUTPUT
getindex(type[, elements...])
Construct a 1-d array of the specified type. This is usually called with the
syntax Type[]. Element values can be specified using Type[a,b,c,...].
Examples
≡≡≡≡≡≡≡≡
julia> Int8[1, 2, 3]
3-element Vector{Int8}:
1
2
3
julia> getindex(Int8, 1, 2, 3)
3-element Vector{Int8}:
1
2
3
getindex(collection, key...)
Retrieve the value(s) stored at the given key or index within a collection.
The syntax a[i,j,...] is converted by the compiler to getindex(a, i, j, ...).
See also get, keys, eachindex.
Examples
≡≡≡≡≡≡≡≡
julia> A = Dict("a" => 1, "b" => 2)
Dict{String, Int64} with 2 entries:
"b" => 2
"a" => 1
julia> getindex(A, "a")
1
getindex(A, inds...)
Return a subset of array A as selected by the indices inds.
Each index may be any supported index type, such as an Integer,
CartesianIndex, range, or array of supported indices. A : may be used to
select all elements along a specific dimension, and a boolean array (e.g. an
Array{Bool} or a BitArray) may be used to filter for elements where the
corresponding index is true.
When inds selects multiple elements, this function returns a newly allocated
array. To index multiple elements without making a copy, use view instead.
See the manual section on array indexing for details.
Examples
≡≡≡≡≡≡≡≡
julia> A = [1 2; 3 4]
2×2 Matrix{Int64}:
1 2
3 4
julia> getindex(A, 1)
1
julia> getindex(A, [2, 1])
2-element Vector{Int64}:
3
1
julia> getindex(A, 2:4)
3-element Vector{Int64}:
3
2
4
julia> getindex(A, 2, 1)
3
julia> getindex(A, CartesianIndex(2, 1))
3
julia> getindex(A, :, 2)
2-element Vector{Int64}:
2
4
julia> getindex(A, 2, :)
2-element Vector{Int64}:
3
4
julia> getindex(A, A .> 2)
2-element Vector{Int64}:
3
4
getindex(tree::GitTree, target::AbstractString) -> GitObject
Look up target path in the tree, returning a GitObject (a GitBlob in the case
of a file, or another GitTree if looking up a directory).
Examples
≡≡≡≡≡≡≡≡
tree = LibGit2.GitTree(repo, "HEAD^{tree}")
readme = tree["README.md"]
subtree = tree["test"]
runtests = subtree["runtests.jl"]
observable[]
Returns the current value of observable.
getindex(A::ArrayPartition, i::Colon, j...)
Returns the entry at index j... of every partition of A.
getindex(A::ArrayPartition, ::Colon)
Returns a vector with all elements of array partition A.
getindex(
c::SciMLBase.AbstractClock,
idx
) -> SciMLBase.IndexedClock
Return a SciMLBase.IndexedClock representing the subset of the time points
that the clock ticked indicated by idx.
v = sd[k]
Argument sd is a SortedDict and k is a key. In an expression, this retrieves
the value (v) associated with the key (or KeyError if none). On the left-hand
side of an assignment, this assigns or reassigns the value associated with the
key. (For assigning and reassigning, see also insert! below.) Time: O(c log n)
cb[i]
Get the i-th element of CircularBuffer.
• cb[1] to get the element at the front
• cb[end] to get the element at the back
getindex(tree, ind)
Gets the key present at index ind of the tree. Indexing is done in increasing
order of key.
Note that the documentation for all methods gets shown and Melissa needs to look for the relevant method first. In this case its the paragraph starting with
getindex(A, inds...)After a bit of pondering the figures it should be enough to add a
method for getindex with a single number.
getindex(trebuchet::Trebuchet, i::Int)Syntactic sugar
| Short syntax | Equivalent function |
|---|---|
| a[1] | getindex(a, 1) |
| a[2] = 3.0 | setindex!(a, 3.0, 2) |
| a.b | getproperty(a, :b) |
| a.b = 4.0 | setproperty!(a, :b, 4.0) |
- You can think of functions being a collection of methods
- Methods are defined by their signature
- The signature is defined by the number of arguments, their order and their type
- Keep the number of positional arguments low
- Macros transform Julia expressions
Content from Interfaces & conditionals
Last updated on 2025-09-30 | Edit this page
Overview
Questions
- How to use conditionals?
- What is an interface?
Objectives
- Writing conditionals
- Understanding interfaces
Conditionals
Before starting to work in a new document, Melissa has to:
- Activate her environment
OUTPUT
Activating project at `~/projects/trebuchet`- Import the package under its modified name
- Define the structures
JULIA
mutable struct Trebuchet <: AbstractVector{Float64}
counterweight::Float64
release_angle::Float64
end
struct Environment
wind::Float64
target_distance::Float64
end
Base.size(::Trebuchet) = tuple(2)Now that Melissa knows that she has to add a method for
getindex(trebuchet::Trebuchet, i::Int)she thinks about the implementation.
If the index is 1 she wants to get the
counterweight field and if the index is 2 she
wants to get release_angle and since these are the only two
fields she wants to return an error if anything else comes in. In Julia
the keywords to specify conditions are if,
elseif and else, closed with an
end.
Thus she writes
JULIA
function Base.getindex(trebuchet::Trebuchet, i::Int)
if i === 1
return trebuchet.counterweight
elseif i === 2
return trebuchet.release_angle
else
error("Trebuchet only accepts indices 1 and 2, yours is $i")
end
endAnd tries again:
OUTPUT
2-element Trebuchet:
500.0
0.7853981633974483Notice, that the printing is different from our
trebuchet in the
former episode.
Interfaces
Why is that? By subtyping Trebuchet as
AbstractVector we implicitly opted into a widespread
interface in the Julia language: AbstractArrays.
An interface is a collection of methods that should be implemented by
all subtypes of the interface type in order for generic code to work.
For example, the Julia
manual lists all methods that a subtype of
AbstractArray need to implement to adhere to the
AbstractArray interface:
-
size(A)returns a tuple containing the dimensions ofA -
getindex(A, i::Int)returns the value associated with indexi -
setindex!(A, v, i::Int)writes a new valuevat the indexi(optional)
Now, that Melissa implemented the mandatory methods for this
interface for the Trebuchet type, it will work with every
function in Base that accepts an
AbstractArray. She tries a few things that now work without
her writing explicit code for it:
OUTPUT
2-element Vector{Float64}:
1000.0
1.5707963267948966OUTPUT
250000.61685027508OUTPUT
2×2 Matrix{Float64}:
250000.0 392.699
392.699 0.61685That is, it now behaves like you would expect from an ordinary matrix.
Now she goes about implementing the missing optional method for
setindex! of the AbstractArray interface.
Implement setindex!
Write the missing method for
setindex!(trebuchet::Trebuchet, v, i::Int) similar to
Melissas getindex function.
With the new Trebuchet defined with a complete
AbstractArray interface, Melissa tries her new method to
modify a counterweight by index:
OUTPUT
2OUTPUT
2-element Trebuchet:
2.0
0.7853981633974483- Conditions use
if,elseif,elseandend - Interfaces are informal
- Interfaces facilitate code reuse
Content from Loops
Last updated on 2025-09-30 | Edit this page
Overview
Questions
- What are for and while loops?
- What is a comprehension?
Objectives
- Writing loops
- Exposure to other language and library features
Before starting to work in a new document, Melissa has to:
- Activate her environment
OUTPUT
Activating project at `~/projects/trebuchet`- Import the package under its modified name
- Define the structures
JULIA
mutable struct Trebuchet <: AbstractVector{Float64}
counterweight::Float64
release_angle::Float64
end
struct Environment
wind::Float64
target_distance::Float64
end
Base.size(::Trebuchet) = tuple(2)
function Base.getindex(trebuchet::Trebuchet, i::Int)
if i === 1
return trebuchet.counterweight
elseif i === 2
return trebuchet.release_angle
else
error("Trebuchet only accepts indices 1 and 2, yours is $i")
end
end
function Base.setindex!(trebuchet::Trebuchet, v, i::Int)
if i === 1
trebuchet.counterweight = v
elseif i === 2
trebuchet.release_angle = v
else
error("Trebuchet only accepts indices 1 and 2, yours is $i")
end
end
function shoot_distance(trebuchet::Trebuchet, env::Environment)
shoot_distance(env.wind, trebuchet.release_angle, trebuchet.counterweight)
end
function shoot_distance(args...) # slurping
    Trebuchets.shoot(args...)[2] # splatting
end
OUTPUT
shoot_distance (generic function with 2 methods)Now Melissa knows how to shoot the virtual trebuchet and get the distance of the projectile, but in order to aim she needs to take a lot of trial shots in a row. She wants her trebuchet to only shoot a hundred meters.
She could execute the function several times on the REPL with different parameters, but that gets tiresome quickly. A better way to do this is to use loops.
Random search
The first thing that comes to her mind is to randomly sample points
of the parameter space of the trebuchet. The function
rand() will give her a random number between 0 and 1 that
is uniformly distributed. So
OUTPUT
2-element Trebuchet:
228.38576259167743
1.0428133782844782will give her a Trebuchet with a weight between 0 and 500 and a release angle between 0 and pi/2 radians at random.
Now she can store the results of 3 random trebuchets in an array like this
JULIA
env = Environment(5, 100)
distances = [shoot_distance(Trebuchet(rand() * 500, rand() * pi / 2), env) for _ in 1:3]OUTPUT
3-element Vector{Float64}:
75.81435701587722
83.01842049268829
67.14411448705451This is called an array comprehension. To get the information of the parameters and the results in one place she writes that again a bit differently
JULIA
N = 10
weights = [rand() * 500 for _ in 1:N]
angles = [rand() * pi/2 for _ in 1:N]
distances = [(w,a) => shoot_distance(Trebuchet(w, a), env) for (w, a) in zip(weights, angles)]OUTPUT
10-element Vector{Pair{Tuple{Float64, Float64}, Float64}}:
(3.3334597480246253, 0.7838682352298685) => 0.6815707596179541
(210.78228935379622, 1.381946534840864) => 35.85286633327975
(401.5993709331619, 0.2185755446723246) => 96.9029165112703
(174.8500444474639, 1.3802675063026215) => 34.83498096430634
(459.5195474131575, 0.6388081196321991) => 117.62925382680423
(325.9792258612826, 1.4742042308383514) => 23.118879918525415
(424.04535348026496, 0.13367159006587603) => 84.32898973441384
(367.203106692998, 0.6088354356429886) => 117.46105246416498
(12.984772128024124, 1.5235451260228559) => 0.6815707596179541
(10.485349585032166, 0.6353974863672037) => 0.6815707596179541Gradient descent
That is working out so far, but Melissa wonders if she can improve her parameters more systematically.
Digression: Gradients
The shoot_distance function takes three input parameters
and returns one value (the distance). Whenever we change one of the
input parameters, we will get a different distance.
The gradient of a function gives the direction in which the return value will change when each input value changes.
Since the shoot_distance function has three input
parameters, the gradient of shoot_distance will return a
3-element Array: one direction for each input
parameter.
Thanks to automatic
differentiation and the Julia package ForwardDiff.jl
gradients can be calculated easily.
Melissa uses the gradient function of
ForwardDiff.jl to get the direction in which she needs to
change the parameters to make the largest difference.
Do you remember?
What does Melissa need to write into the REPL to install the package
ForwardDiff?
] install ForwardDiffadd ForwardDiff] add ForwardDiff.jl-
] add ForwardDiff
JULIA
using ForwardDiff: gradient
imprecise_trebuchet = Trebuchet(500.0, 0.25pi);
environment = Environment(5.0, 100.0);
grad = gradient(x ->(shoot_distance([environment.wind, x[2], x[1]])
- environment.target_distance),
imprecise_trebuchet)OUTPUT
2-element Vector{Float64}:
-0.12516519503998055
-49.443442438172205Melissa now changes her arguments a little bit in the direction of the gradient and checks the new distance.
JULIA
better_trebuchet = imprecise_trebuchet - 0.05 * grad;
shoot_distance([5, better_trebuchet[2], better_trebuchet[1]])OUTPUT
-2.785549535224487Great! That didn’t shoot past the target, but instead it landed a bit too short.
Experiment
How far can you change the parameters in the direction of the gradient, such that it still improves the distance?
JULIA
better_trebuchet = imprecise_trebuchet - 0.04 * grad
shoot_distance([environment.wind, better_trebuchet[2], better_trebuchet[1]])
120.48753521261001JULIA
better_trebuchet = imprecise_trebuchet - 0.03 * grad
shoot_distance([environment.wind, better_trebuchet[2], better_trebuchet[1]])
107.80646596787481JULIA
better_trebuchet = imprecise_trebuchet - 0.02 * grad
shoot_distance([environment.wind, better_trebuchet[2], better_trebuchet[1]])
33.90699307740854JULIA
better_trebuchet = imprecise_trebuchet - 0.025 * grad
shoot_distance([environment.wind, better_trebuchet[2], better_trebuchet[1]])
75.87613276409223Looks like the “best” trebuchet for a target 100 m away will be between 2.5% and 3% down the gradient from the imprecise trebuchet.
For loops
Now that Melissa knows it is going in the right direction she wants
to automate the additional iterations. She writes a new function
aim, that performs the application of the gradient
N times.
JULIA
function aim(trebuchet, environment; N = 5, η = 0.05)
better_trebuchet = copy(trebuchet)
for _ in 1:N
grad = gradient(x -> (shoot_distance([environment.wind, x[2], x[1]])
- environment.target_distance),
better_trebuchet)
better_trebuchet -= η * grad
end
return Trebuchet(better_trebuchet[1], better_trebuchet[2])
end
better_trebuchet = aim(imprecise_trebuchet, environment);
shoot_distance(environment.wind, better_trebuchet[2], better_trebuchet[1])OUTPUT
-2.2195176928658915Explore
Play around with different inputs of N and
η. How close can you come?
This is a highly non-linear system and thus very sensitive. The
distances across different values for the counterweight and the release
angle α look like this: 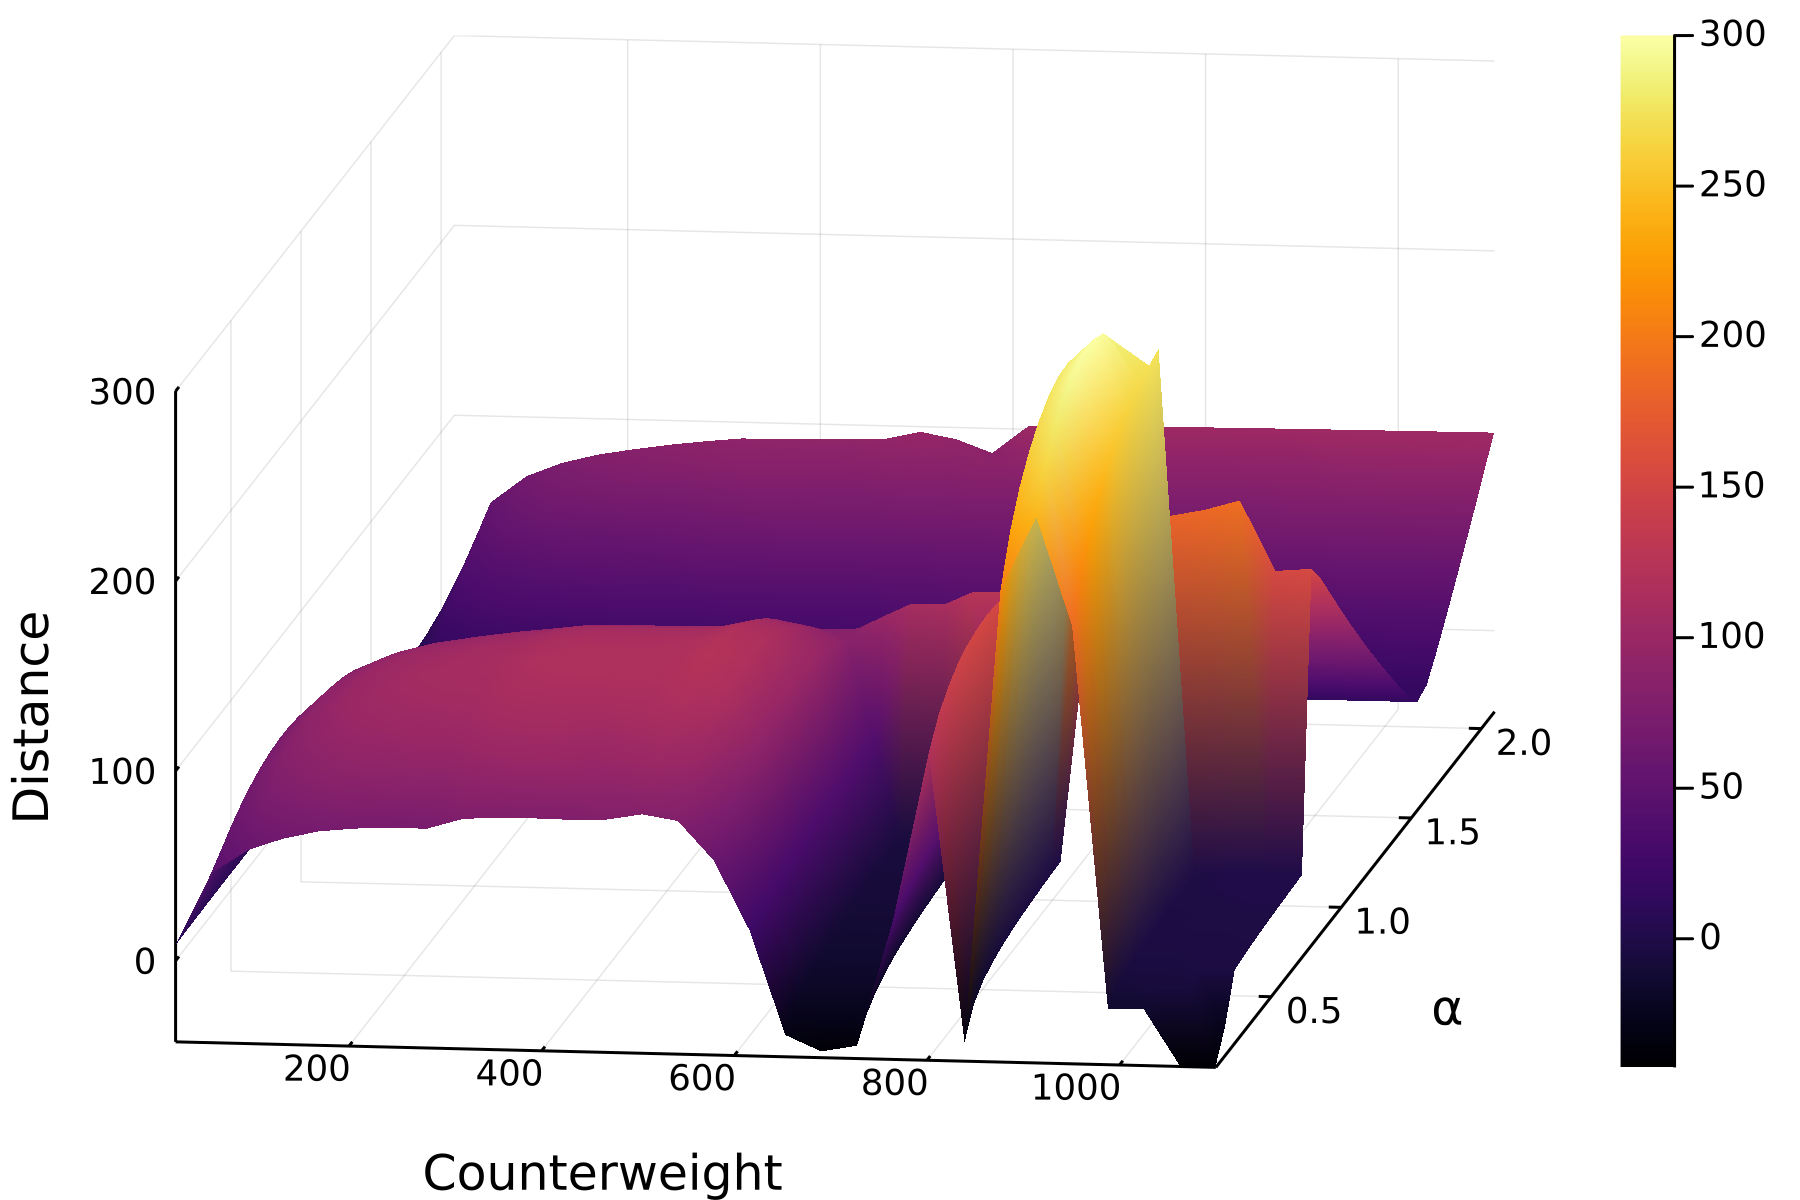
Aborting programs
If a call takes too long, you can abort it with
Ctrl-c
While loops
Melissa finds the output of the above aim function too
unpredictable to be useful. That’s why she decides to change it a bit.
This time she uses a while-loop to run the iterations until
she is sufficiently near her target.
(Hint: ε is
\epsilontab, and η is
\etatab.)
JULIA
function aim(trebuchet, environment; ε = 0.1, η = 0.05)
better_trebuchet = copy(trebuchet)
hit = x -> (shoot_distance([environment.wind, x[2], x[1]]) - environment.target_distance)
while abs(hit(better_trebuchet)) > ε
grad = gradient(hit, better_trebuchet)
better_trebuchet -= η * grad
end
return Trebuchet(better_trebuchet[1], better_trebuchet[2])
end
better_trebuchet = aim(imprecise_trebuchet, environment);
shoot_distance(better_trebuchet, environment)OUTPUT
100.05601729579894That is more what she had in mind. Your trebuchet may be tuned differently, but it should hit just as close as hers.
- Use for loops for a known number of iterations and while loops for an unknown number of iterations.
Content from Part III: Managing Julia Projects
Last updated on 2025-09-17 | Edit this page
Objectives
- Learn how modules work
- Learn how to create a package
- Learn basic built-in testing tools
Episodes
Content from Using Modules
Last updated on 2025-09-17 | Edit this page
Overview
Questions
- What’s the purpose of modules?
Objectives
- Structure your code using modules
- Use Revise.jl to track changes
Modules
Melissa now has a bunch of definitions in her running Julia session and using the REPL for interactive exploration is great, but it is more and more taxing to keep in mind what is defined, and all the definitions are lost once she closes the REPL.
That is why she decides to put her code in a file. She opens up her
text editor and creates a file called aim_trebuchet.jl in
the current working directory and pastes the code she got so far in
there. This is what it looks like:
JULIA
using Pkg
Pkg.activate("projects/trebuchet")
import Trebuchet as Trebuchets
using ForwardDiff: gradient
mutable struct Trebuchet <: AbstractVector{Float64}
counterweight::Float64
release_angle::Float64
end
Base.size(trebuchet::Trebuchet) = tuple(2)
Base.getindex(trebuchet::Trebuchet, i::Int) = getfield(trebuchet, i)
function Base.setindex!(trebuchet::Trebuchet, v, i::Int)
    if i === 1
        trebuchet.counterweight = v
    elseif i === 2
        trebuchet.release_angle = v
    else
        error("Trebuchet only accepts indices 1 and 2, yours is $i")
    end
end
struct Environment
wind::Float64
target_distance::Float64
end
function shoot_distance(args...)
Trebuchets.shoot(args...)[2]
end
function shoot_distance(trebuchet::Trebuchet, env::Environment)
shoot_distance(env.wind, trebuchet.release_angle, trebuchet.counterweight)
end
function aim(trebuchet::Trebuchet, environment::Environment; ε = 1e-1, η = 0.05)
better_trebuchet = copy(trebuchet)
hit = x -> (shoot_distance([environment.wind, x[2], x[1]]) - environment.target_distance)
while abs(hit(better_trebuchet)) > ε
grad = gradient(hit, better_trebuchet)
better_trebuchet -= η * grad
end
return Trebuchet(better_trebuchet[1], better_trebuchet[2])
end
imprecise_trebuchet = Trebuchet(500.0, 0.25pi)
environment = Environment(5, 100)
precise_trebuchet = aim(imprecise_trebuchet, environment)
shoot_distance(precise_trebuchet, environment)Now Melissa can run include("aim_trebuchet.jl") in the
REPL to execute her code.
She also recognizes that she has a bunch of definitions at the beginning that she doesn’t need to execute more than once in a session and some lines at the end that use these definitions which she might run more often. She will split these in two separate files and put the definitions into a module. The module will put the definitions into their own namespace which is the module name. This means Melissa would need to put the module name before each definition if she uses it outside of the module. But she remembers from the Using the package manager Episode that she can export names that don’t need to be prefixed.
She names her module MelissasModule and accordingly the
file MelissasModule.jl. From this module she exports the
names aim, shoot_distance,
Trebuchet and Environment. This way she can
leave her other code unchanged.
JULIA
module MelissasModule

using Pkg
Pkg.activate("projects/trebuchet")
import Trebuchet as Trebuchets
using ForwardDiff: gradient

export aim, shoot_distance, Trebuchet, Environment

mutable struct Trebuchet <: AbstractVector{Float64}
    counterweight::Float64
    release_angle::Float64
end

Base.size(trebuchet::Trebuchet) = tuple(2)

Base.getindex(trebuchet::Trebuchet, i::Int) = getfield(trebuchet, i)

function Base.setindex!(trebuchet::Trebuchet, v, i::Int)
    if i === 1
        trebuchet.counterweight = v
    elseif i === 2
        trebuchet.release_angle = v
    else
        error("Trebuchet only accepts indices 1 and 2, yours is $i")
    end
end

struct Environment
    wind::Float64
    target_distance::Float64
end

function shoot_distance(args...)
    Trebuchets.shoot(args...)[2]
end

function shoot_distance(trebuchet::Trebuchet, env::Environment)
    shoot_distance(env.wind, trebuchet.release_angle, trebuchet.counterweight)
end

function aim(trebuchet::Trebuchet, environment::Environment; ε = 1e-1, η = 0.05)
    better_trebuchet = copy(trebuchet)
    hit = x -> (shoot_distance([environment.wind, x[2], x[1]]) - environment.target_distance)
    while abs(hit(better_trebuchet)) > ε
        grad = gradient(hit, better_trebuchet)
        better_trebuchet -= η * grad
    end
    return Trebuchet(better_trebuchet[1], better_trebuchet[2])
end
end # MelissasModule
The rest of the code goes to a file she calls
MelissasCode.jl.
JULIA
using .MelissasModule

imprecise_trebuchet = Trebuchet(500.0, 0.25pi)
environment = Environment(5, 100)
precise_trebuchet = aim(imprecise_trebuchet, environment)
shoot_distance(precise_trebuchet, environment)
Now she can include MelissasModule.jl once, and change
and include MelissasCode.jl as often as she wants. But what
if she wants to make changes to the module? If she changes the code in
the module, re-includes the module and runs her code again, she only
gets a bunch of warnings, but her changes are not applied.
Revise.jl
Revise.jl is a package that can keep track of changes in
your files and load these in a running Julia session.
Melissa needs to take two things into account:
-
using Revisemust come beforeusingany Package that she wants to be tracked - she should use
includetinstead ofincludefor included files (tfor “tracking”)
Thus she now runs
JULIA
using Revise

includet(joinpath(path,"MelissasModule.jl"))
include(joinpath(path,"MelissasCode.jl"))
OUTPUT
100.05601729579894where path is the path to her files.
and any change she makes in MelissasModule.jl will be
visible in the next run of her code.
Did I say any changes?
Well, almost any. Revise can’t track changes to structures.
- Modules introduce namespaces
- Public API has to be documented and can be exported
Content from Creating Packages
Last updated on 2025-09-30 | Edit this page
Overview
Questions
- How to create a package?
Objectives
- Learn setting up a project using modules
- Learn common package structure
- Learn to browse GitHub or juliahub for packages and find documentation
Melissa is now confident that her module is fine and she wants to make it available for the rest of her physics club. She decides to put it in a package. This way she can also locally use Julia’s package manager for managing her module.
From project to package
The path from having a module to having a package is actually very
short: Packages need a name and a uuid field
in their Project.toml.
A UUID is a universally unique
identifier. Thankfully Julia comes with the
UUIDs package, that can generate uuids for
Melissa via UUIDs.uuid4().
In addition Melissa needs to have a specific directory structure. She
looks at the example package Example.jl
which has the following structure:
├── docs
│   ├── make.jl
│   ├── Project.toml
│   └── src
│       └── index.md
├── LICENSE.md
├── Project.toml
├── README.md
├── src
│   └── Example.jl
└── test
└── runtests.jlMake it a package
You can open your Project.toml and add
name = <your name>,
uuid = <your uuid> and optionally an
authors field, each on a separate line.
The basic src structure can be generated with a complete
Project.toml using the generate command from
Pkg. Melissa enters pkg mode using ].
OUTPUT
  Generating  project MelissasModule:
    projects/MelissasModule/Project.toml
    projects/MelissasModule/src/MelissasModule.jl
Melissa’s new package directory structure looks like this.
├── Project.toml
└── src
    └── MelissasModule.jl
She opens the newly generated Project.toml to see the
contents (The uuid and authors fields will be
unique to you:
name = "MelissasModule"
uuid = "..."
authors = ["..."]
version = "0.1.0"
Melissa knows she needs the Trebuchet and
ForwardDiff packages as dependencies. She activates her new
project and adds them:
OUTPUT
Activating project at `~/projects/MelissasModule`OUTPUT
   Resolving package versions...
      Compat entries added for Trebuchet, ForwardDiff
    Updating `~/projects/MelissasModule/Project.toml`
  [f6369f11] + ForwardDiff v1.2.1
  [98b73d46] + Trebuchet v0.2.2
    Updating `~/projects/MelissasModule/Manifest.toml`
  [...]
The Project.toml now has entries for those
dependencies:
name = "MelissasModule"
uuid = "..."
authors = ["..."]
version = "0.1.0"

[deps]
ForwardDiff = "f6369f11-7733-5829-9624-2563aa707210"
Trebuchet = "98b73d46-197d-11e9-11eb-69a6ff759d3a"

[compat]
ForwardDiff = "1.2.1"
Trebuchet = "0.2.2"
The generated source file src/MelissasModule.jl looks
like this:
Melissa replaces the greet() function with the contents
of her module she created earlier (except for the two lines using
Pkg; there is no need to activate another
project now that her module is part of a project with those
dependencies).
Now Melissa can use
instead of needing to includet MelissasModule.jl, and
she can write using MelissasModule instead of
using .MelissasModule. She modifies
MelissasCode.jl accordingly.
Register a package
In order for her friends to be able to get the package, Melissa registers the package in the general registry. This can be done either via JuliaHub or by making a pull request on GitHub which can also be automated by the Julia Registrator.
Creating a new package
Melissa thinks next time she will start with a package right away.
Browsing the packages she found PkgTemplates.jl and PkgSkeleton.jl which makes setting up the typical folder structure very easy.
Create your own package
Look at the documentation of the package creation helper packages and
create a new package using generate.
- The general registry is hosted on GitHub.
- Packaging is easy
Content from Adding tests
Last updated on 2025-09-30 | Edit this page
Overview
Questions
- What are unit tests?
- How are tests organized in Julia?
Objectives
- Learn to create unit tests and test sets using the
Teststandard library
Unit tests
Now that Melissa has released her first package she fears that future changes will impact the existing functionality of her package. This can be prevented by adding tests to her package.
Looking at the structure of other packages Melissa figured out that
tests usually go in a separate test folder next to the
src folder. This should contain a runtests.jl
file.
The standard library Test provides the functionality for
writing tests: namely, the macros @test and
@testset.
@test can be used to test a single equality, such as
OUTPUT
Test PassedSeveral tests can be grouped in a test set with a descriptive name
OUTPUT
Test.DefaultTestSet("Test arithmetic equalities", Any[], 1, false, false, true, 1.731669987513481e9, 1.731669987543832e9, false)Melissa sees that she can run her package tests using the pkg mode of the REPL:
ERROR
ERROR: Package MelissasModule did not provide a `test/runtests.jl` file
Remember from earlier that the conventional project structure
included a test/runtests.jl file? This file is the entry
point for package tests.
Test environment
Melissa needed to add Test to her package in order to
run the code above, but actually Test is not needed for her
package other than testing. Melissa needs to generate a testing
environment with its own dependencies:
OUTPUT
Activating new project at `~/projects/MelissasModule/test`
OUTPUT
  Resolving package versions...
    Updating `~/projects/MelissasModule/test/Project.toml`
  [8dfed614] + Test v1.11.0
    Updating `~/projects/MelissasModule/test/Manifest.toml`
  [2a0f44e3] + Base64 v1.11.0
  [b77e0a4c] + InteractiveUtils v1.11.0
  [56ddb016] + Logging v1.11.0
  [d6f4376e] + Markdown v1.11.0
  [9a3f8284] + Random v1.11.0
  [ea8e919c] + SHA v0.7.0
  [9e88b42a] + Serialization v1.11.0
  [8dfed614] + Test v1.11.0
Now Melissas project structure looks like this:
MelissasModule/
├── Project.toml
├── src
│   └── MelissasModule.jl
└── test
    └── Project.toml
And the test/Project.toml has:
[deps]
Test = "8dfed614-e22c-5e08-85e1-65c5234f0b40"
Using just one Project.toml
Alternatively, Melissa could include the Test package as
an “extra” in her top-level Project.toml and require that
dependency for the test target.
Check out the Project.toml from the Example.jl project for an example of this.
Challenge
Create a test for MelissasModule in test/runtests.jl
Create a test that ensures that shoot_distance returns a
value that is between target - ε and
target + ε.
JULIA
using MelissasModule
using Test

@testset "Test hitting target" begin
    imprecise_trebuchet = Trebuchet(500.0, 0.25pi)
    environment = Environment(5, 100)
    precise_trebuchet = aim(imprecise_trebuchet, environment)
    final_distance = shoot_distance(precise_trebuchet, environment)
    @test 100 - 0.1 <= final_distance <= 100 + 0.1
    # default ε is 0.1
    # could also use:
    # @test abs(final_distance - 100) <= 0.1
end
Now Melissa can run this test from pkg mode:
OUTPUT
     Testing MelissasModule
      Status `/tmp/jl_TTQJwg/Project.toml`
  [34b7a6fa] MelissasModule v0.1.0 `~/projects/MelissasModule`
  [8dfed614] Test v1.11.0
      Status `/tmp/jl_TTQJwg/Manifest.toml`
  [...]
  ⋮
  # Skipping output here setting up the temporary testing environment
  ⋮
     Testing Running tests...
Test Summary:       | Pass  Total   Time
Test hitting target |    1      1  19.7s
     Testing MelissasModule tests passed
- Tests are important