
Summary and Schedule
The best way to learn how to program is to do something useful, so this introduction to Python is built around a common scientific task: data analysis.
Scenario: A Miracle Arthritis Inflammation Cure
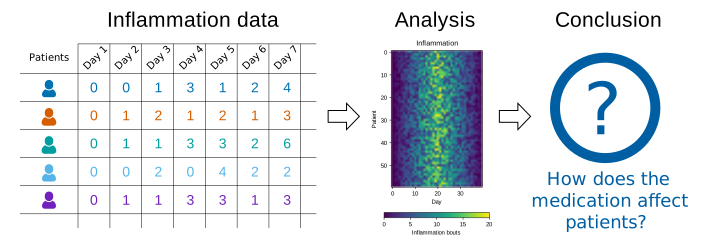
Our imaginary colleague “Dr. Maverick” has invented a new miracle drug that promises to cure arthritis inflammation flare-ups after only 3 weeks since initially taking the medication! Naturally, we wish to see the clinical trial data, and after months of asking for the data they have finally provided us with a CSV spreadsheet containing the clinical trial data.
The CSV file contains the number of inflammation flare-ups per day for the 60 patients in the initial clinical trial, with the trial lasting 40 days. Each row corresponds to a patient, and each column corresponds to a day in the trial. Once a patient has their first inflammation flare-up they take the medication and wait a few weeks for it to take effect and reduce flare-ups.
To see how effective the treatment is we would like to:
- Calculate the average inflammation per day across all patients.
- Plot the result to discuss and share with colleagues.
Data Format
The data sets are stored in comma-separated values (CSV) format:
- each row holds information for a single patient,
- columns represent successive days.
The first three rows of our first file look like this:
0,0,1,3,1,2,4,7,8,3,3,3,10,5,7,4,7,7,12,18,6,13,11,11,7,7,4,6,8,8,4,4,5,7,3,4,2,3,0,0
0,1,2,1,2,1,3,2,2,6,10,11,5,9,4,4,7,16,8,6,18,4,12,5,12,7,11,5,11,3,3,5,4,4,5,5,1,1,0,1
0,1,1,3,3,2,6,2,5,9,5,7,4,5,4,15,5,11,9,10,19,14,12,17,7,12,11,7,4,2,10,5,4,2,2,3,2,2,1,1
Each number represents the number of inflammation bouts that a particular patient experienced on a given day.
For example, value “6” at row 3 column 7 of the data set above means that the third patient was experiencing inflammation six times on the seventh day of the clinical study.
In order to analyze this data and report to our colleagues, we’ll have to learn a little bit about programming.
Prerequisites
You need to understand the concepts of files and directories and how to start a Python interpreter before tackling this lesson. This lesson sometimes references Jupyter Notebook although you can use any Python interpreter mentioned in the Setup.
The commands in this lesson pertain to any officially supported Python version. Newer versions usually have better error printouts, so using newer Python versions is recommend if possible.
Getting Started
To get started, follow the directions on the Setup page to download data and install a Python interpreter.
| Setup Instructions | Download files required for the lesson | |
| Duration: 00h 00m | 1. Copying our Python Template | How do I create a GitLab project from a template? |
| Duration: 00h 10m | 2. Python Fundamentals |
What basic data types can I work with in Python? How can I create a new variable in Python? How do I use a function? Can I change the value associated with a variable after I create it? How can I get help while learning to program? |
| Duration: 00h 40m | 3. Analyzing Patient Data | How can I process tabular data files in Python? |
| Duration: 01h 40m | 4. Visualizing Tabular Data |
How can I visualize tabular data in Python? How can I group several plots together? |
| Duration: 02h 30m | 5. Storing Multiple Values in Lists | How can I store many values together? |
| Duration: 03h 15m | 6. Repeating Actions with Loops | How can I do the same operations on many different values? |
| Duration: 03h 45m | 7. Analyzing Data from Multiple Files | How can I do the same operations on many different files? |
| Duration: 04h 05m | 8. Making Choices | How can my programs do different things based on data values? |
| Duration: 04h 35m | 9. Creating Functions |
How can I define new functions? What’s the difference between defining and calling a function? What happens when I call a function? |
| Duration: 05h 05m | 10. Errors and Exceptions |
How does Python report errors? How can I handle errors in Python programs? |
| Duration: 05h 35m | 11. Defensive Programming | How can I make my programs more reliable? |
| Duration: 06h 15m | 12. Debugging | How can I debug my program? |
| Duration: 07h 05m | 13. Command-Line Programs | How can I write Python programs that will work like Unix command-line tools? |
| Duration: 07h 35m | Finish |
The actual schedule may vary slightly depending on the topics and exercises chosen by the instructor.
Overview
This lesson is designed to be run on a personal computer. All of the software and data used in this lesson are freely available online, and instructions on how to obtain them are provided below.
Install uv and Python
You will need to install the uv tool for this workshop. Detailed training on uv is available here. The below instructions are copied from that workshop.
Install uv on macOS and Linux with:
BASH
$ curl -LsSf https://astral.sh/uv/install.sh | sh
# If curl is not present, then you can try wget below
$ wget -qO- https://astral.sh/uv/install.sh | sh
Install uv on Windows with:
You may need to restart your terminal to ensure that uv was
installed. Check the installation by displaying the version number using
the --version option as shown below. If the command
displays the uv version number then the installation was successful.
OUTPUT
uv 0.8.4 (e176e1714 2025-07-30)